RV life offers the freedom to travel
wherever and whenever you want—but when it comes to plumbing, things can get a bit tricky. Unlike a traditional home, an RV has a
self-contained plumbing system that relies on different tanks to manage water usage and waste.
If you're new to RVing (or just want to avoid messy mistakes), understanding
how your toilet and tanks work together is essential. Let’s break down
RV plumbing, how to maintain it, and tips for keeping things running smoothly!
How RV Plumbing Works: A Simple Overview 🚽💧
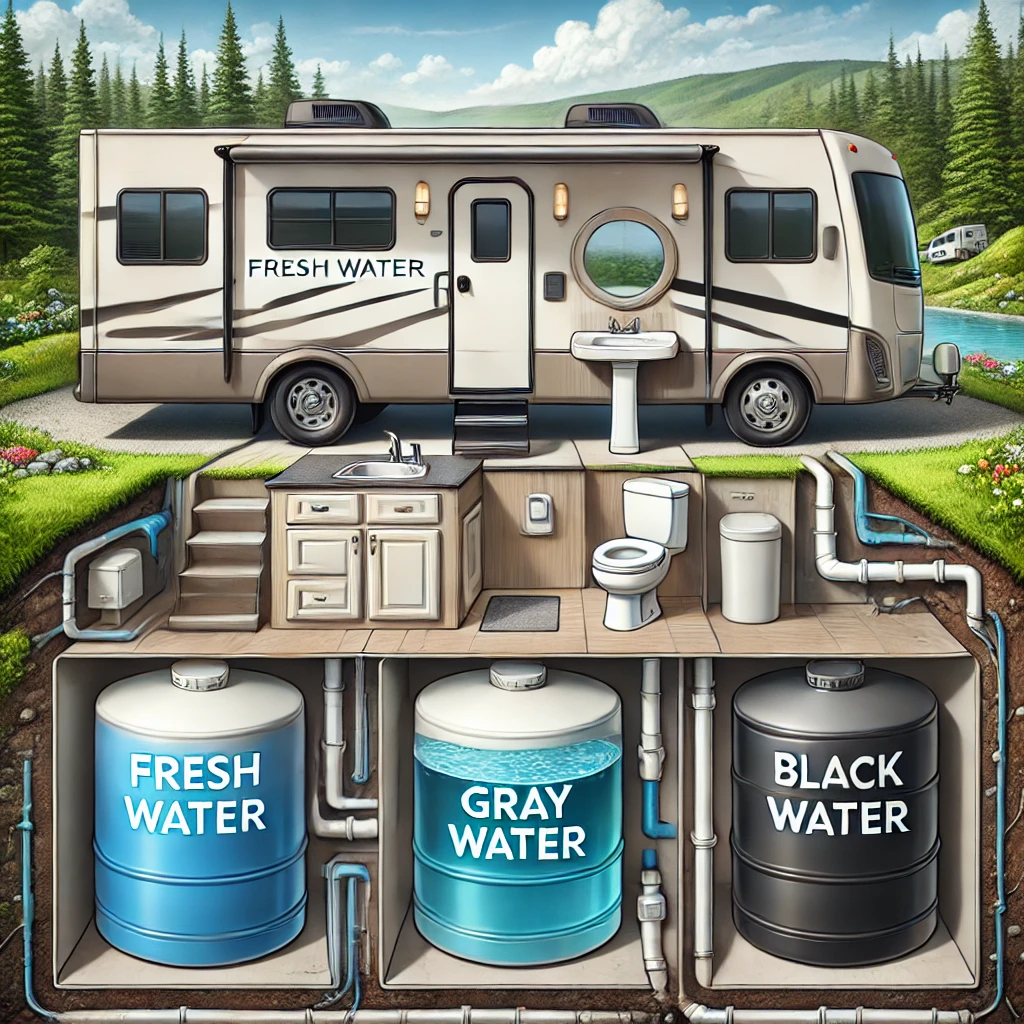
Your RV plumbing system consists of
three main tanks that handle water flow and waste disposal:
✔
Freshwater Tank – Stores clean water for drinking, cooking, and washing.
✔
Gray Water Tank – Holds used water from sinks and showers.
✔
Black Water Tank – Collects waste from your RV toilet.
Each tank plays a vital role in keeping your RV plumbing functional. Let’s take a
closer look at each one and how they all work together.
1. The Freshwater Tank: Your Clean Water Supply 💦
Your
freshwater tank is the
starting point of your RV’s plumbing system. It stores clean water that gets
pumped to your faucets, shower, and toilet.
How It Works:
- Water is stored in a designated tank (size varies by RV model).
- A 12V water pump pushes water through the plumbing when you turn on a faucet.
- The water is used for drinking, cooking, showering, and flushing the toilet.
Tips for Managing Freshwater Supply:
✔
Always sanitize your freshwater tank every few months.
✔
Use a water filter to remove contaminants before filling the tank.
✔
Monitor water levels—if the tank runs dry, your pump can be damaged.
💡
Pro Tip: When hooked up to a city water connection at a campground, your RV bypasses the tank and uses the direct water supply.
2. The Gray Water Tank: Where Used Water Goes 🚿
Your
gray water tank collects
all non-toilet wastewater from the
sinks and shower. This includes:
✔ Soap and shampoo residue from the shower.
✔ Dishwater and food particles from the sink.
✔ Leftover water from handwashing or brushing teeth.
How It Works:
- Water drains from sinks and showers into the gray water tank.
- When the tank is full, you must dump it at an RV dump station.
- A valve at the bottom of the tank lets you empty it through a sewer hose.
Tips for Maintaining the Gray Tank:
✔ Use
biodegradable soaps to prevent buildup in the tank.
✔
Don’t let food scraps go down the drain—use a strainer in the sink.
✔ Dump the gray tank
after the black tank to help flush out the sewer hose.
💡
Pro Tip: Gray water can sometimes
smell bad if grease and food particles build up—use a tank deodorizer to keep it fresh!
3. The Black Water Tank: Toilet Waste Management 🚽
The
black water tank holds
all waste from your RV toilet. Unlike the other tanks, this one requires
careful handling and regular dumping.
How It Works:
- When you flush, waste goes directly into the black water tank.
- The tank holds the waste until you dump it at a designated RV dump station.
- A special sewer hose connects to the tank’s outlet for easy draining.
Tips for Black Tank Maintenance:
✔
Always use RV-safe toilet paper—it dissolves faster and prevents clogs.
✔
Use black tank treatment (enzymes or deodorizer) to break down waste and reduce odors.
✔
Keep the black tank valve closed until dumping—this prevents solid waste from getting stuck.
💡
Pro Tip: Flush the black tank
with plenty of water each time you dump to prevent buildup!
How the Tanks Work Together 🚰
All three tanks operate
independently, but they work together to
keep your RV’s plumbing flowing smoothly:
✔
Freshwater flows into the RV for drinking, washing, and flushing.
✔ Used water
drains into the gray tank (sinks & shower) or black tank (toilet).
✔
Both tanks need to be emptied regularly at a dump station.
✔
Gray water should always be dumped after black water to help rinse out the sewer hose.
💡
Pro Tip: Never mix fresh and waste water hoses—color-code them to avoid contamination!
Dumping Your RV Tanks: The Right Way
Dumping your tanks is part of RV life, and doing it correctly
prevents messes, bad smells, and plumbing issues.
Step-by-Step Guide to Dumping Tanks:
1️⃣
Connect the sewer hose to the black tank outlet and attach it securely to the dump station.
2️⃣
Dump the black tank first—let all the waste flow out completely.
3️⃣
Rinse the black tank by adding clean water and dumping again.
4️⃣
Dump the gray tank next—this helps wash out any leftover waste in the hose.
5️⃣
Disconnect, rinse, and store your sewer hose properly.
✔ Always use
disposable gloves while handling the sewer hose.
✔
Never leave the black tank valve open while camping—it can cause clogs.
✔ Rinse everything thoroughly to
prevent odors and bacteria buildup.
💡
Pro Tip: Invest in a
clear elbow connector for your sewer hose so you can see when the water runs clean.
Common RV Plumbing Problems (And How to Fix Them!)
Even with proper care,
issues can arise. Here’s how to handle common RV plumbing problems:
🚫
Slow Draining Sinks/Showers: Likely a gray tank clog—use a mild enzyme cleaner.
🚫
Bad Odors from Tanks: Could be a venting issue—check your tank vents and use deodorizer.
🚫
Toilet Won’t Flush Properly: Might be a clog—flush with extra water or use a tank wand.
🚫
Leaky Water Connections: Check fittings and tighten any loose connections.
🚫
Black Tank Sensor Reads Full When Empty: Use a tank cleaning wand to remove waste buildup.
💡
Pro Tip: Keeping your plumbing system clean
prevents costly repairs and keeps your RV experience stress-free.
Final Thoughts: Mastering Your RV’s Plumbing System
Understanding your
RV’s toilet and tank system helps prevent
unwanted surprises, bad smells, and plumbing mishaps. By following
proper maintenance and dumping routines, you’ll keep your RV’s plumbing in
top shape and enjoy
hassle-free travels.
✔
Freshwater tank = Your clean water supply
✔
Gray water tank = Sink & shower drainage
✔
Black water tank = Toilet waste disposal
💡
Key Takeaway: Take care of your RV’s plumbing, and it’ll take care of you on the road!
🚐
Now, get out there and enjoy a fresh, worry-free camping trip! 🏕️✨